


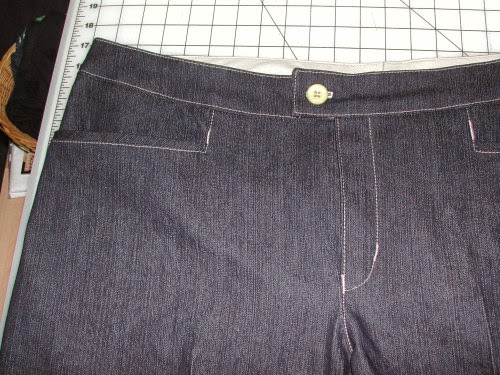
Finished view on actual jeans. The rest of the photos were taken using sample pieces so proportions will not be accurate. Also, these steps will result in a fly that opens like men's pants (left over right), which is common for jeans for both sexes.
1. Front pants pieces with extended pocket facings in place. The shape of these facings isn't exactly right so I hope you can use your imagination for that. I extend the section of the facings that meets the center front so that it covers most of the vertical fly facing area. I prefer this for stabilization instead of fusible interfacing on the fly facings. The edges of the fly facings, front crotch curve and pocket facings should be overlocked (or otherwise edge-finished) before starting. The pocket facings and fly facings are not serged together even though they sort of look like it here.

2. Baste from the waist to the red dot where the fly facing starts to curve. Lock stitches and then straight stitch between the dots using a regular stitch length. Stop about 1 inch from the inseam.

3. Clip the fly facings at the bottom of the curve. I clip diagonally so the cut is on the bias and won't fray.

4. Press fly facings open from both wrong side and right side to create a crisp fold.

5. Use a big jeans/denim needle. For heavy denim, I use 110/18.

6. After pressing, the first step is to top/edgestitch the center front of the fly. I use my center rudder (stitch in the ditch) foot with the needle in the far right position. Don't forget to increase your stitch length for topstitching, especially with heavy thread.

The completed edgestitching.

7. Now for the zipper. Use a zipper that is longer than the fly opening. It will be cut off at the top after the waistband is applied (not covered in this tutorial). I also never insert a zipper without Collins Wonder Tape. Apply a strip of Wonder Tape on each top side of the zipper tape, starting at the bottom metal stop and for as long as the fly opening. Do not peel off the paper yet.

8. Peel off the Wonder Tape paper on the left (as you're looking at it face up) side only. Turn the zipper right side down and align the now left edge of the zipper with the center front seam. Finger press on the right side of the zipper to stick it onto the fly shield. The only part of the zipper which should be stuck is shown by the red line below.

9. Move all layers to the left, except for the zipper and the fly facing it's stuck to, as shown below.

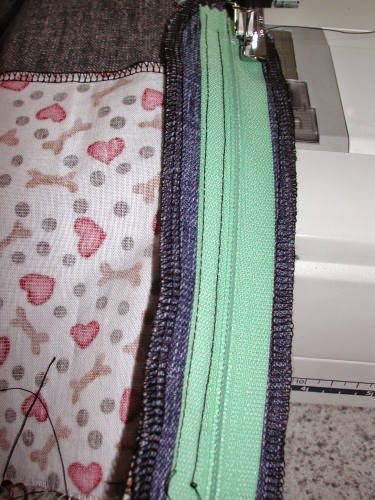
10. With a zipper foot, stitch close to the zipper and again close to the edge of the zipper tape. I swear, I usually sew straighter than this but I was hurrying to make this sample and so it is what it is.

11. Turn zipper over and remove the paper from the other strip of Wonder Tape.

12. Turn the assembly face down again and pull the zipper over to the other fly facing as far as it can go without rippling. Because denim is thick, the fly facings won't lay flat at this point. Just keep things even and neat and you'll be OK.

13. Move all layers to one side, except the zipper and the remaining fly facing. Stitch close to the zipper and again near the edge of the zipper tape. I stitch bottom to top for this side.
14. Turn the assembly over and remove the center front basting. Stop ripping when you get to the regular length stitches!

15. Unzip the zipper and press the underlayer flat. Steam/press out the fold from the basting seam and press in a crease next to the zipper.
16. Use a template to chalk in a guideline for topstitching the fly. Unfortunately, I think the templates I use aren't being made anymore. A piece of oaktag or the back of a zipper packet will work too. Be careful that your chalk line doesn't cross the zipper stop or you'll break a needle when you're topstitching.


17. Topstitch along the chalked line. I use the ditch foot for this too, as the rudder stitcks up and makes it easier for me to see where I'm going. An applique foot would work too, but this foot would already be out and I'm lazy.


18. Fly shield. (If you don't want a fly shield, skip to Step 20.) I use good quality cotton for my pocket bags and fly shields. It holds up well, doesn't get all wrinkly in the laundry and doesn't add the bulk that the same pieces in denim would
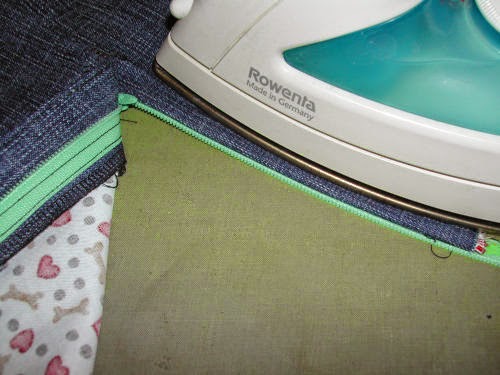
For the fly shield, cut a piece of fabric the length of the zipper facing and twice the width. Fold in half lengthwise, wrong sides together and press. Zip the zipper and then place the raw edges of the shield over the overlocked edge of the fly facing. The fold of the fly shield is being pointed to by the red lines in the photo below.

19. Overlock the raw edges of the fly shield to the zipper facing. You can include, or not, the pocket facing (the section behind the fly facing) in the overlocking. Next, overlock just the bottom edge of the fly shield. I missed getting that in the photo.

20. Open the pants front to expose the fly shield.

Using the ditch foot and left needle position, stitch to the left of the zipper coil from waist down as far as you can before hitting the zipper tab. See the red line in the photo below.


21. With all layers smooth and flat below, bartack from the top as shown below. You are trying to catch the flyshield with the bartacks. See the photo below with the bartacks circled in red.


Voila! You're done. Don't cut off the top of the zipper until after you've sewn on the waistband so that you don't accidentally zip the tab right off the top of the zipper coils.

When you are edge/topstitching along the Center Back and crotch curve seam, use the ditch foot with the same needle position as in Step 6 above and all the stitching will line up perfectly. With the jeans inside out, start at the CB and stitch along the seam, catching the seam allowances underneath. Stop at the front where your fly topstitching ended, pull the threads to the back and secure them.
Hi Debbie,
ReplyDeleteThanks for all the wonderful tutorials.Could you please tell me where you buy precut knit bindings (that i could use with my coverstitch machine binder attachment).I'm making t-shirts.
I'm sorry I can't help - I never use precut knit bindings as it's easy to just cut my own from my own choice of fabric.
ReplyDeleteDebbie,
ReplyDeleteSorry to bug you, but I can't find your Hidden elastic waist tutorial on your new blog. Will you be posting it later?
Thanks,
Judy (Novicesewist at patternreview)
Judy, it's up.
ReplyDeleteI found my way here via Tanit-Isis Sews. Just want to thank you for an excellent and very clear tutorial.
ReplyDeleteThis after I just read the following in Make Your Own Pants and Skirts by Irene Cumming Kleeberg (Bantam, 1971) --
If you want to make a pair of pants with a fly front, go ahead. Follow the directions on the pattern -- blindly, I suggest -- if you want. Making a fly on a pair of pants is something I've only done once and I found it difficult and boring.
Ha! I'm glad I persevered. Thanks Debbie.
Followed your link from MPB jeans sew-along. With the info in this tutorial and my current zipper sewing experiences it will be much easier for me to tackle the jeans zipper now. Thank you very much!
ReplyDeleteThanks for your great tutorial. I found you via MBP. I'm following step by step and the result is fab, including curved seams
ReplyDeleteHi Debbie
ReplyDeleteI found you via PR when I was trying to work this out. This is a wonderfully clear and very helpful tutorial. Thank you for your time and effort in producing it.
Julia
Thank you for this tutorial. A link from the blog Jillybejoyful landed me here at this fly tutorial.
ReplyDeleteOh Debbie, where has this tutorial been all my life. I actually think I bookmarked this some time ago but haven't actually read through it until now. I have made three or four sorry attempts at sewing a jeans fly. I'm excited to attempt it again after reading this. Thanks!
ReplyDeleteThanks for making this, it's so clear and easy to follow.
ReplyDeleteDebbie, I've usually used Sandra Betzina's video on fly zippers, but this takes things further. I like the initial topstitch and the fly shield. Thanks for a nice tutorial!
ReplyDeleteThank you very much for this tutorial, it made making nice pants a whole lot easier!
ReplyDeleteI found you via the oliver+s forum,this is marvelous!
ReplyDeleteThank you so much!
This was wonderfully helpful converting an oliver+s Sketchbook shorts pattern to a zipper so that my 15 year old son can continue to wear them.
ReplyDeleteThank you very much!
Thank you for this!
ReplyDeleteHi Debbie, I found this tutorial linked to from several other blogs and just wanted to say thank you! I'm making my second pair of jeans and your method looks awesome and worked perfectly.
ReplyDeleteThank you again for this wonderful tutorial
ReplyDeleteJust wanted to say thank you for this tutorial. It made sewing the fly in my new jeans really straightforward.
ReplyDeleteAh! fly shield looks easy now, as it gave me trouble before. Thanks so much for posting with lots of great details and photos!
ReplyDeleteI just wanted to let you know that every time I make my jeans I refer back to your wonderful notes, so thankyou very much.
ReplyDelete